Tag: network

Real time body camera system – Server Storage – part 3

In the last two parts of this series, we discussed our network protocol and the architecture of our body camera system. We shall discuss our backend recording and streamers service in this final part. After that, we shall present the budget we burnt for this MVP, and finally, we shall discuss why it did not work.

There are multiple server video streaming solutions across the market. Unfortunately, most of them require installing new desktop software or plugins. At the same time, we saw that no video storage format is codec agnostic and could support multiple frames using different codecs. All these weaknesses forced us to develop our storage format for our videos. After a reasonable amount of time of thinking about what would be the format we need for this kind of work, we formulated the following requirements:

  • Blazing fast append: We wanted to write down the incoming frames as fast as possible. Every slowdown of reindexing the frames would decrease performance and increase the cost.
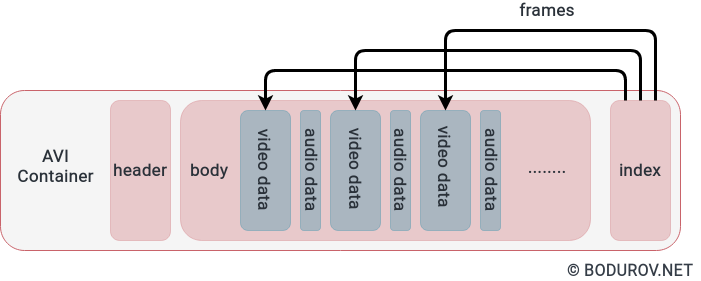
  • File-based:  Storing a significant amount of data into a database is the wrong approach for media-based files. So the file format had to be binary based. Because of the previous requirement, we had to skip the index. Every index recalculation would end up in a lousy performance.
  • To support telemetry: We did not stream only video and audio data, but we also streamed telemetry. There had to be a way to stream its frames as well. Plus, there were use cases in which the user of the body camera could want to stream only telemetry, but not video.
  • Websocket streaming: Since we can not support another streaming format, we decided that streaming from our server to the web browser clients in the headquarters will be based on WebSockets. To do this properly, we had to implement our video player.

Fortunately, if we analyze our network protocol, we can see the following characteristics which will fulfill the requirements:

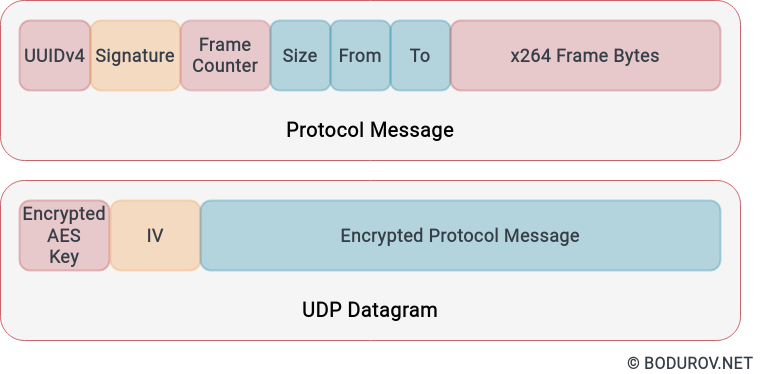
  • Partitioning: Every network packet has a unique user id and date. And that is enough to determine the filename of the stream uniquely.
  • Counter: Every network packet has a unique counter value, and this value is attached to the date. At the beginning of every day, we moved the counter to zero. If we analyze further the logic of this counter, it could be used as an index key, by which we can sort by time the whole stream.
  • Supports telemetry: Our network protocol supports telemetry by default.
  • Supports WebSockets: We can reuse the same binary message we received from the Android device for WebSocket streaming. The message must be just encoded properly for WebSocket streaming.
You can see the modified version of our frames container on the diagram. It follows the header:body format, where the header represents a metadata structure for the next frame. By iterating the whole file, we could index the metadata into our server’s memory

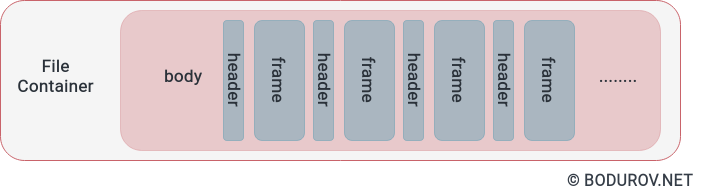
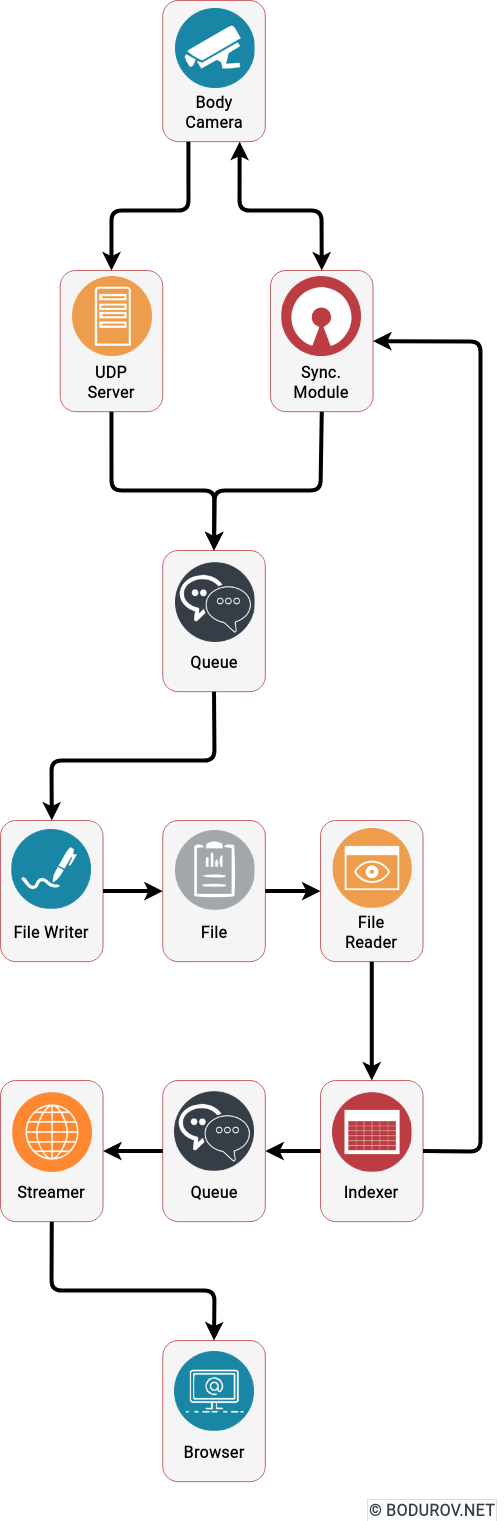
With the information from the previous bullets, we can define the following logic. We append every incoming packet to its corresponding file on the filesystem, similarly to what pcap is doing with the network packets. At the same time, another process is reading the file and building the index in memory of our service. And the service uses this index to restream the recorded network packets through web sockets to the web browser player.

To implement the described logic, we decided to build the following system modules:

  • UDP server listener module: The idea of this module is to listen for UDP packets and reroute them to a concurrent queue. The FileWriter module later consumes this concurrent queue.
  • Concurrent queue module: Having in mind that we can have multiple process workers, instead of using mutexes or any other synchronization mechanisms, we decided to communicate using queues between the processes.
  • FileReader module: This module’s primary duty is to read the file packet by packet, using the already loaded index.
  • FileWriter module: The idea of this module is to take the packets from the queue and store them into the file. Partitioning per file per queue was implemented, and every file had a FileWriter process.
  • Indexer module:  It reads the file and indexes the network packets into the memory. After that, it is used by the Streamer module to stream data.
  • Streamer module: This was a collection of processes that started by given offset and used the indexer module to send data to the WebSocket server.
  • Web browser player module: The module was used to decode the network packets coming from the WebSocket server and play video and telemetry data in the browser.
  • Synchronization module: The idea of this module was to provide a way for the synchronization of missing packets between the Android device and the streaming server. We used the index module to return a given user and date for which frames are missing.

One can easily modify the proposed architecture to support cloud deployment and high scalability by replacing the concurrent queues with message brokers and the local filesystem with GlusterFS.

You can see a sample system architecture on the diagram describing the listed components. Arrows represent the data flows and how the data passed through the system

After we finished the technical details of the implementation, let’s discuss how much it cost for us to implement the MVP:

Budget:

  • Android device (200$): We decided to use a standard Redmi 3 device. It supported all the needed features, and it had an excellent battery.
  • Extended battery development (3000$): We developed two battery versions because the first one was not good enough, and our hardware vendor did not provide a quality job. We had to switch vendors, etc.
  • USB Camera (200$): Fortunately, we used an already produced board, so the price was relatively low. Still, we had to buy multiple cameras until we found the most suitable one.
  • 3d printing (400$): 3d printing of multiple prototypes is expensive. And we had to try with various variations.
  • Camera mounts (30$): The camera mounts were already manufactured.
  • Software development (23000$): One developer spent a whole year working part-time on this project. He implemented the backend server and the mobile application for the Android device.
  • Hardware development (8000$): Our hardware guy spent a couple of months developing proper housing and an alternative battery unit for our Android device.
  • Business development (1500$): Fortunately, we did not spend a lot of money on business development.

So we managed to implement the technical MVP for a total cost of 36330$. We tried to sell it, and we failed brutally.

Why we failed

As a team without experience in developing hardware products, we made many errors. Fortunately, it was our first and last try at selling a hardware product. We took our lessons, which I shall list:

  • No business need: For every successful product, you need a local business need, with which you can test your idea and see whether you will have traction. Burgas is an almost crime-free city, so no need for such a system.
  • No hardware ecosystem: There is no ecosystem of electronic hardware manufacturers in Burgas. So you become dependent on people you do not know and even have never met.
  • No delivery pipelines: Making hardware depends on your components delivery pipelines. We did not have any established channels and no partners with such.
  • No investor: Hardware startups are not for bootstrapping. You need a good amount of money to hire the proper people and to make sure once you have MVP, you can buy a good amount of items. Hardware items supply can end, and after that, you have to redesign your solution.
  • Wrong paradigm: Hardware products do not scale so much as digital ones. It will help if you have a good global distribution network and marketing to do it successfully. Being in the 4th city by size in Bulgaria, with 200,000 people, did not help.

In conclusion, despite the problems, we managed to produce MVP, which is a piece of fantastic news. Unfortunately, we could never sell this MVP to anyone for the listed reasons. Looking at the good side of things, we learned what mistakes to avoid when penetrating a market. It helped us with our following products. 

Cybersecurity tactics for small teams – Network Security – part 2

Please check the previous part – here.

Now, as we can see, attackers can penetrate all of the hardware network devices we reviewed. How easily it depends on how do you set up your cybersecurity and patch policy. 

It is clear that despite your best effort, you must not blindly trust your routers and switches. Lack of trust is precisely the paradigm behind the zero trust model. At the same time, to make attackers’ life harder, it is important to mention three types of defensive cybersecurity tools, which can help you increase your defenses and trust in your local network. 

Until the end of this article, I shall describe them. As a final, I shall give a sample budget for both router and switch devices. Both of them will use open-source software. Usually, they receive software updates quite often and can offer your a good level of security.

Firewalls

A firewall is a network security service that monitors incoming and outgoing network traffic and decides whether to allow or block specific traffic based on a defined set of security rules.

Firewalls have been the first line of defense in network security for over 25 years. They establish a barrier between secured and controlled internal networks that you can trust and untrusted outside networks, such as the Internet. 

Usually, in the case of home networks, this service is deployed in your hardware router. The last sentence means that the attacker will expose your entire local network to the Internet in case of router penetration.

Intrusion Detection/Prevention

An intrusion prevention system (IPS) is a form of network security that detects and prevents identified threats. Intrusion prevention systems continuously monitor your network, looking for possible malicious incidents and capturing information about them. The IPS reports these events to system administrators and takes preventative action, such as closing access points and configuring firewalls to prevent future attacks.

An intrusion detection system (IDS) is a device or software application that monitors a network or systems for malicious activity or policy violations. Any intrusion activity or breach is typically reported either to an administrator or collected centrally using a security information and event management (SIEM) system. A SIEM system combines outputs from multiple sources and uses alarm filtering techniques to distinguish malicious activity from false alarms.

At home routers, intrusion prevention systems can be deployed on the router device and inspect all the incoming network packets from the Internet. On the other hand, an intrusion detection system is deployed on all the hardware devices connected to your local network. In simpler words, prevention systems monitor your incoming traffic, and detection systems monitor your local network for anomalies. 

On the diagram, you can see a standard SIEM system. The idea of the system is to aggregate all of your logs and data and offer analytics to your security engineers

Group Policy

Group Policies, in part, control what users can and cannot do on a computer system. For example, a Group Policy can enforce a password complexity policy that prevents users from choosing an overly simple password. Other examples include allowing or preventing unidentified users from remote computers to connect to a network share or block/restrict specific folders. A set of such configurations is called a Group Policy Object (GPO). 

Now, group policies can be a powerful instrument for system administrators to define how the organization computers act to different security threats. Unfortunately, Group Policy settings are enforced voluntarily by the targeted applications. In many cases, this merely consists of disabling the user interface for a particular function of accessing it. Alternatively, a malicious user can modify or interfere with the application to not successfully read its Group Policy settings, thus enforcing potentially lower security defaults or even returning arbitrary values.

For home-based local networks, the usage of group policies is usually limited. Still, I would advise system administrators of small teams to think carefully, how to add group policies to their remote office deployments. In combination with VPN, Group Policies can add much value to your cybersecurity workflow.

Budget

As I promised at the beginning of this series, I shall give a sample security budget for every topic we discuss. Again I will tailor the budget to small teams with an underfunded budget for cybersecurity defenses. 

  • Router (180$): I would go for Pfsense or IPFire based hardware appliances. Both provide reasonable protections, even though the first is based on FreeBSD and the second is a Linux distribution. Both have state-of-the-art firewalls, and both support Snort and Suricata, which are the best intrusion prevention systems. Additionally, they have Syslog support so that the router can become a part of an intrusion detection system.
  • Switch (150$): SwitchBlox Rugged is a good option here. It is a little bit more expensive than the standard network switches. However, it comes with an open-source networking operating system and can work in harsh environments. Two switches can be stacked together.
  • SIEM System (0$): MozDef is a SIEM system developed by Mozilla. It is open-source and supports all the necessary features for SIEM systems. 
  • Group Policy Server (150$): We can order PC Engine’s apu4d4 unit and install on top of it Univention Corporate Server. With it, we can create policies for Ubuntu and Windows-based computers.

With a total budget of around 480$, we achieved a pretty good level of security. Still, a determined attacker can penetrate this setup, but it will take him more time and resources. The switch is optional, but it will help if you want improved security and choose to have a WiFi network for guests only.

In conclusion, setting up a network perimeter can be done effectively on a budget. Still, it is essential to note that the budget does not include the human hours needed to set up the equipment and your local network.

Next part is – here.

Real time body camera system – Network Protocol – part 1

In this series of articles, we shall discuss one of my old projects. During that time, I had a consulting company working in IT, and this project was part of my initial steps in cybersecurity. The project started around the middle of 2015 and ceased to exist at the end of 2016. It is in body cameras, and actually, it was a competition to systems such as Axon Body 3 camera. During the lifecycle of this project, Axon cameras did not support LTE-based streaming.

The team around the project and I managed to produce a working prototype of the system, and in this series, I shall present to you how we implemented the prototype. At the end of the articles, I shall show you the actual budget for doing this prototype and analyze why it was unsuccessful. 

The topic of this part will be an analysis of the advantages and disadvantages of the current video streaming network protocols. We shall start with the standard video streaming protocols, and at the end of the article, we shall discuss our modified, more secure protocol.

There are multiple different protocols for video streaming. Part of them do not support encryption, and we shall focus ourselves on those which support it.

RTMPe

Real-Time Messaging Protocol or RTMP is used to stream multimedia data – audio and video – between Flash Media Server and Flash Player. The chief utility of the RTMP stream is in the optimization of the audio and video data transfer between the server and player.

Encrypted RTMP (RTMPE) wraps the RTMP stream session in a lightweight encryption layer. Through Encrypted RTMPE, the streaming protocol provides low-level stream encryptions for high-traffic sites. RTMPE uses the Anonymous Diffie-Hellman key exchange method. In this algorithm, two parties – the media server and the flash player – establish a shared secret key over an insecure channel.

The standard RMTP protocol uses TCP, and RTPMe uses an encryption model based on a shared secret.

HTTP Live Streaming Encryption Methods

While the HLS supports AES-128 encryption, there are two different ways to implement the standard in practice.

Broadcasters can use one key to encrypt the entire video stream, but that also means the whole stream is unprotected if an unauthorized third party intercepts the secret key.

Alternatively, each segment of a stream can be encrypted with a different key. That way, users can access only a few seconds of video with each specific key. Broadcasters might choose this method if the video content their sharing is highly sensitive.

As it comes from its name, HTTP Streaming uses HTTP to resemble MPEG-DASH. It works by breaking the overall stream into a sequence of small HTTP-based file downloads, each downloading one short chunk of a broad, potentially unbounded transport stream. A list of available streams, encoded at different bit rates, is sent to the client using an extended M3U playlist. HTTP is a TCP-based protocol, as well.

MPEG DASH Encryption

Dynamic Adaptive Streaming over HTTP (DASH), also known as MPEG-DASH, is an adaptive bitrate streaming technique that enables high-quality streaming of media content over the Internet delivered from conventional HTTP web servers. Similar to Apple’s HTTP Live Streaming (HLS) solution, MPEG-DASH works by breaking the content into a sequence of small segments, which are served over HTTP. Each piece contains a short interval of playback time of content that is potentially many hours in duration, such as a movie or the live broadcast of a sports event.

MPEG DASH supports a Common Encryption mode (CENC), which Bento4 implements. Encrypted MPEG DASH presentations should also include the proper signaling in the MPD to inform the player of what DRM(s) can be used to obtain the decryption keys for the streams. An MPD can contain DRM signaling for several DRMs (either just one or multiple entries if the same stream can reach players with different DRM technologies).

Again MPEG Dash is based on HTTP, aka TCP. In that case, DRM encryption is usually based on a public, private key encryption scheme.

On the diagram, you can see a standard AVI container. The video data objects are x264/h264 frames, which most of the streaming protocols encrypt, encode, and stream.

Our Modified Streaming Protocol

As you can see from the upper paragraphs, every standard encryption protocol was designed to stream data from a centralized server to a list of devices. Most of them use the traditional HTTP delivery networks to speed up their streaming. In our case, we had an entirely different problem. We had to stream encrypted content from multiple body cameras to a centralized server and, after that, restream the video from the server to a web browser-based dashboard. LTE networks can be quite fast when you have proper coverage, but when your signal drops, your network speed drops significantly, as well. So we decided to design our video streaming protocol, and I shall list our requirements:

  • Based on UDP: Sending TCP data through LTE can hurt your performance a lot. That’s the reason we decided to establish our protocol on UDP and to implement packet control.
  • Based on X264: X264 is an open-source implementation of the H.264 protocol. It is already implemented in most Android devices and is supported natively. The encoding rate is reasonable.
  • Codec agnostic: In the future, we wanted to support H.265 and its open-source implementation. Thus the protocol had to be code agnostic.
  • To use hybrid encryption: Most of the listed protocols do not use a hybrid encryption approach. We wanted our protocol to have better authentication and encryption mechanism, and that’s why we decided to use hybrid-based encryption on top of RSA and AES-GCM. We changed the keyphrase and IV for AES on every packet frame sent to implement the encryption correctly.
  • Binary-based: Keeping in mind that LTE is usually sold using monthly plans. These plans are generally only a couple of gigabytes. So we ended up making a binary-based protocol. Any other protocols, and especially the semantic-based ones, would result in more significant data consumption.
  • Adaptive Bitrate: The LTE network bandwidth depends on how strong a radio signal your device has. The weaker the signal, the lower the bandwidth. We had to implement an adaptive bitrate strategy, which lowered the resolution in a weaker signal. This way, you could receive frames no matter how strong is your LTE cell signal.

Our proof of concept implementation managed to fulfill these requirements. The finished network protocol was fast enough and binary compatible. It supported adaptive bitrate and was code agnostic. 

On the diagram, you can see a sample datagram of this protocol. The MTU was 1500 bytes to support all kinds of equipment, but not only with jumbo frames.

We used an UUIDv4 and RSA signature for authentication purposes. After that, you have multiple fields as a counter in the index, date, packet size, and an array of bytes. The implementation stripped down an h.264 frame to multiple UDP packets and sent them together. The server combined them back to the h.264 packet and appended them to corresponding files. 

We saw that it is better to have adaptive logic on the codec level during our tests for the protocol. For example, a simple JPEG stream was much better when the signal was weaker.

In the next part, we shall discuss how we created our body camera device and its software. We shall discuss our streaming server implementation in the final third part, give you a budget, and explain why the whole business model did not work as expected.

Next part is here